
Want a faster website? A Content Delivery Network (CDN) can make it happen. Here’s how:
- What is a CDN? It’s a network of servers worldwide that stores your site’s static assets (images, CSS, JS) closer to users, cutting load times and reducing server strain.
- Why does speed matter? Pages loading in under 2 seconds retain more users, boost conversions, and improve SEO rankings.
- Benefits of a CDN: Faster load times, lower server costs, improved security (DDoS protection), and better handling of traffic spikes.
- How to prepare:
- Analyze your site’s performance with tools like PageSpeed Insights.
- Back up your site to avoid downtime during setup.
- Choose the right CDN provider (options include Cloudflare, BunnyCDN, AWS CloudFront).
Ready to integrate? Follow these steps:
- Update DNS records or use plugins for platforms like WordPress.
- Configure SSL settings to avoid mixed content errors.
- Fine-tune cache rules for static assets and test with tools like curl.
A properly configured CDN can offload up to 95% of static traffic, ensuring faster, more reliable performance for users everywhere.
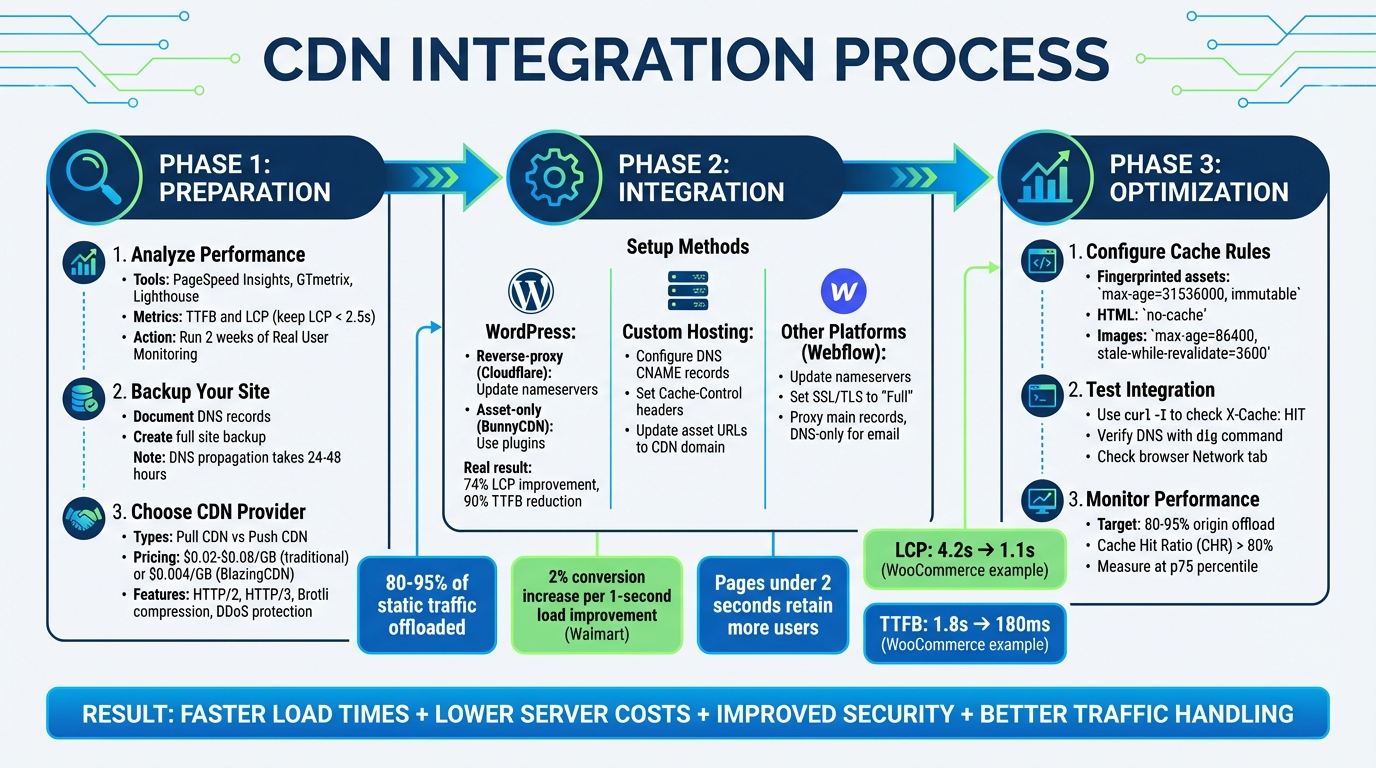
CDN Integration Process: From Analysis to Optimization in 3 Phases
How to implement a CDN
Proper implementation is a key part of hosting and maintenance services that keep your site running at peak performance.
sbb-itb-7a4ada9
Preparing for CDN Integration
Getting ready for CDN integration is all about laying the groundwork to ensure the process is smooth and your site remains functional. Rushing through this step can lead to broken assets, mixed content issues, or even downtime. As Alvin Collin from IsItWP shared:
"I learned this the hard way when I accidentally took down IsItWP during my first attempt to set up CloudFlare."
To avoid similar pitfalls, take the time to analyze, back up, and plan. Here’s how to prepare effectively, from assessing performance to choosing the right provider.
Analyze Your Website’s Performance
Start by establishing a performance baseline. Tools like PageSpeed Insights, GTmetrix, or Lighthouse can give you a clear snapshot of your site’s performance in specific regions. Pay close attention to metrics like Time to First Byte (TTFB) and Largest Contentful Paint (LCP) – Google recommends keeping LCP under 2.5 seconds.
To get a complete picture, combine these lab tests with two weeks of Real-User Monitoring (RUM). This approach captures data across different networks, devices, and locations. Inventory your static assets – images (JPEG, WebP, SVG), CSS/JS files, fonts (WOFF2), and static HTML pages – and classify them by how often they change. For example:
- Immutable: Versioned files that rarely change.
- Rarely updated: Logos or branding assets.
- Frequently updated: Hero images or dynamic banners.
This classification will guide your caching policies and improve load times.
Next, analyze your traffic. Identify regions with the most visitors, peak hours, and any seasonal spikes. Use tools like DNSPerf to check your DNS resolution times from different regions and waterfall diagrams to identify bottlenecks in asset loading. These insights will help you fine-tune your setup for better performance.
Backup Your Website
Backing up your site is non-negotiable. Misconfigured DNS or SSL settings can take your site offline. WordPress users can make this step easier with plugins like Duplicator Pro, which allow one-click backups of both files and databases.
Document your current nameservers and DNS records so you can quickly revert if needed. Keep in mind, DNS propagation for new nameservers can take 24 to 48 hours globally. If possible, test your CDN setup in a staging environment before making changes live.
Also, ensure your origin server has a valid SSL certificate and understand the SSL mode your CDN requires. For instance, Cloudflare’s "Full (strict)" mode can prevent redirect loops if configured correctly.
"While there’s no cause for alarm, I always recommend backing up your WordPress site before making any major changes." – Alvin Collin, IsItWP
Once your backup is complete, you’re ready to select a CDN provider.
Choose the Right CDN Provider
Selecting a CDN provider depends on your site’s traffic, requirements, and budget. Start by deciding between two types:
- Pull CDN: Automatically fetches content from your origin server when requested.
- Push CDN: Requires manual file uploads, better suited for large download libraries or software packages.
When evaluating providers, focus on performance consistency. Look for low and stable TTFB across all regions, not just your primary one. Ensure the provider supports modern protocols like HTTP/2, HTTP/3 (QUIC), and Brotli compression, and offers advanced cache controls, such as origin override and stale-while-revalidate.
Security features are equally critical. Look for robust DDoS protection, SSL/TLS optimization with 0-RTT resumption, and Web Application Firewalls.
Pricing varies widely. Traditional CDNs charge between $0.02 and $0.08 per GB, while newer options like BlazingCDN start at around $4 per TB (roughly $0.004 per GB). Estimate your bandwidth usage to avoid unexpected costs. If you’re already using AWS, CloudFront may integrate seamlessly with S3 and EC2.
Finally, confirm the provider supports Cross-Origin Resource Sharing (CORS) for fonts and scripts, especially if you plan to use a static subdomain like cdn.example.com. Check if they offer origin shielding, which adds an intermediate caching layer to reduce the load on your origin server.
Step-by-Step Guide to CDN Integration
Once your site is analyzed, backed up, and a CDN provider is chosen, the next step is integration. Properly setting up a CDN ensures traffic routes through edge servers, applies caching rules, and secures SSL encryption. The result? Lower latency and faster load times.
Setting Up a CDN for WordPress
WordPress users have two main approaches for CDN integration. Full reverse-proxy setups, like Cloudflare, route all traffic through the CDN by updating your domain’s nameservers. On the other hand, asset-only CDNs, such as BunnyCDN, focus on delivering static files by rewriting URLs via plugins, leaving dynamic content on the origin server.
For reverse-proxy setups, update your domain’s nameservers with the ones provided by the CDN. Once the changes propagate, configure DNS records in your CDN dashboard. Set your root domain (@) and the www subdomain to Proxied to enable caching. Keep MX and FTP records as DNS-only to avoid email and file transfer issues. Ensure the SSL/TLS mode is set to Full (Strict) if your host has a valid certificate to prevent redirect loops.
A real-world example: A WooCommerce site using Cloudflare’s $5/month APO add-on saw a 74% improvement in Largest Contentful Paint (LCP) and a 90% reduction in Time to First Byte (TTFB). LCP dropped from 4.2 seconds to 1.1 seconds, while TTFB improved from 1.8 seconds to just 180 milliseconds. Additionally, the site’s capacity increased from 8 to 42 pages per minute.
To fine-tune the setup, use page rules to exclude /wp-admin/*, /wp-login.php*, and WooCommerce checkout pages from caching. Install the official Cloudflare plugin to automate cache purging when posts or themes are updated.
For asset-only setups, start by creating a "Pull Zone" in your CDN dashboard that points to your origin domain. Then, install a plugin like CDN Enabler or W3 Total Cache. Enter the CDN URL (e.g., cdn.yoursite.com) in the plugin settings to serve static assets, such as images, CSS, and JavaScript, from the CDN.
"When you implement a Content Delivery Network (CDN) correctly for a WordPress site, you can unlock massive gains in speed, scalability, and reliability without rebuilding your stack from scratch." – Alex Belov, CEO, Belov Digital Agency
Integrating a CDN with Custom Hosting
For custom hosting environments, you’ll need to manually configure caching and DNS settings. Start by identifying static assets like images (WebP, SVG), CSS/JS bundles, fonts (WOFF2), and PDFs, which are ideal for caching.
Your origin server remains the primary source of content, but you can optimize performance by enabling compression (Gzip or Brotli) and setting appropriate HTTP headers:
- Versioned assets (e.g.,
style.v2.css,app.3f9a2c.js):Cache-Control: public, max-age=31536000, immutable - Images:
Cache-Control: public, max-age=2592000(one month)
Next, create a CDN distribution using your origin domain (e.g., origin.example.com) and define cache behavior rules for different file types. Most CDNs operate on a pull model, fetching content from your origin server on the first request and caching it at edge locations.
To set up DNS, create a CNAME record for a dedicated subdomain (e.g., static.example.com) that points to the CDN’s hostname (e.g., cdn.provider.net). If you use a separate static domain, configure Cross-Origin Resource Sharing (CORS) headers at the origin to avoid browser issues with fonts or scripts.
Update your application’s asset URLs to reference the CDN domain. For example, change <img src="/images/logo.png"> to <img src="https://static.example.com/images/logo.png">. If your origin server is behind a firewall, whitelist the CDN’s IP ranges.
A well-optimized static CDN setup can reduce origin server traffic by 80–95% during high-traffic periods, improving overall performance. For even greater efficiency, consider enabling origin shielding, which adds an extra caching layer to reduce direct requests to your server.
Enabling CDN for Webflow or Other Platforms

Platforms like Webflow typically require nameserver integration. Start by updating your nameservers with those provided by the CDN in your domain registrar.
Once updated, the CDN will automatically scan your DNS records. In the CDN dashboard, set your main site records (A and CNAME for @ and www) to Proxied for caching and DDoS protection. Keep email-related records (MX, TXT) as DNS-only to avoid SMTP issues.
Adjust SSL/TLS settings to Full to prevent redirect loops between the platform’s hosting and the CDN. If you encounter 301 redirect errors when sharing links on social media, disable "Always Use HTTPS" and "Automatic HTTPS Rewrite" in the CDN’s edge certificate settings. To maintain functionality, create page rules to bypass caching for administrative or dynamic paths specific to your platform.
You can verify the integration by visiting yourdomain.com/cdn-cgi/trace (for Cloudflare users). This will confirm whether traffic is routing through the CDN’s edge servers. These steps ensure your site benefits from faster load times and better global performance without compromising functionality.
Optimizing and Testing Your CDN Setup
Fine-tuning your CDN setup is all about adjusting cache rules to lighten the load on your origin server and improving cache hit ratios.
Configuring Cache Rules and Headers
Getting the right Cache-Control headers in place is key for making your CDN work efficiently. For fingerprinted assets – like files with content hashes such as app.a1b2c3.js or style.v2.css – use this header: Cache-Control: public, max-age=31536000, immutable. This ensures the file is cached for a year without requiring revalidation. Facebook discovered that adding the immutable directive cut down unnecessary revalidation for about 20% of their static assets.
For HTML documents, use no-cache to ensure they’re revalidated on every request. For images without fingerprints, try Cache-Control: public, max-age=86400, stale-while-revalidate=3600. This allows slightly outdated images to load while the CDN fetches an updated version in the background.
Here’s a quick guide to recommended headers:
| Asset Type | Recommended Cache-Control Header |
|---|---|
| Fingerprinted Static (JS/CSS) | public, max-age=31536000, immutable |
| HTML Documents | no-cache |
| Non-fingerprinted Images | public, max-age=86400, stale-while-revalidate=3600 |
| Public API Responses | public, max-age=60, s-maxage=300, stale-while-revalidate=30 |
| Sensitive/Private Data | no-store |
To avoid cache fragmentation, make sure to remove unnecessary query parameters like utm_source or fbclid from cache keys. Also, steer clear of using Vary: User-Agent headers, as they can complicate caching unnecessarily.
By implementing a solid custom header strategy, you can cut down origin traffic by up to 70% and reduce Time to First Byte (TTFB) by half.
"Every HTTP request that never leaves the browser cache is a request your server doesn’t have to handle – and one your user doesn’t have to wait for".
Once your cache headers are in place, it’s time to test if everything is working as expected.
Testing CDN Integration
To make sure your cache rules are applied correctly, you’ll need to run some tests. Using tools like curl or browser developer tools can help confirm that the appropriate cache headers and DNS settings are in place.
Run this command in your terminal:
curl -I [URL] Look for headers like X-Cache: HIT, CF-Cache-Status: HIT, or a nonzero Age value. The first request might show a MISS while the CDN fetches content from your origin server, but subsequent requests should display a HIT.
In your browser, open the Network tab in developer tools, reload the page, and inspect the headers of a static asset. Cached resources are often labeled as "(disk cache)" or "(memory cache)" in the Size column.
To verify DNS settings, use dig or an online DNS lookup tool to confirm your CNAME record points to your CDN provider’s domain. You can also test geographic performance using third-party tools to ensure requests are routed to the nearest Point of Presence (POP). If assets don’t load from the CDN subdomain, check that your origin server sends proper Access-Control-Allow-Origin headers to avoid CORS issues.
Monitoring Performance and Analytics
Once your setup is validated, keep an eye on key metrics like Cache Hit Ratio (CHR) and origin offload. These metrics provide insight into how well your CDN is performing.
- Cache Hit Ratio (CHR): This shows the percentage of requests served from the CDN edge. If the ratio is low, it could be due to issues like overly short cache expirations, query string handling problems, or frequent manual purges.
- Origin Offload: A well-tuned CDN can offload between 80% and 95% of static traffic, reducing the burden on your origin server.
Break down total latency into components like Client RTT (handshake time), Edge Processing (cache lookups and Web Application Firewall checks), and Origin Latency. Google advises measuring performance at the 75th percentile (p75) rather than relying on averages. Pages with poor Largest Contentful Paint (LCP) often have a median p75 TTFB of about 2,270 milliseconds.
Watch for uncacheable traffic. Research shows that roughly 21% of websites mistakenly use the Cache-Control: no-store directive on resources that could otherwise be cached.
"Network latency is a physics problem, but user experience is an engineering problem".
The impact of these optimizations is real. Walmart, for example, reported a 2% increase in conversions for every 1-second improvement in page load time. This highlights how performance tuning directly influences business outcomes.
Troubleshooting Common CDN Issues
Even after setting up your CDN, you might run into issues that require some troubleshooting. Let’s look at some common problems and how to resolve them.
SSL Certificate and Mixed Content Errors
When HTTPS pages load some resources over HTTP, it can trigger mixed content errors. These errors can impact your site in two ways:
| Mixed Content Type | Examples | Browser Action | Impact |
|---|---|---|---|
| Active | Scripts (.js), Stylesheets (.css), Iframes, API calls | Completely blocked | Breaks site layout and functionality |
| Passive | Images (.jpg, .png), Audio, Video | Loads with a warning | "Not Secure" icon; reduces user confidence |
To identify problematic HTTP URLs, open your browser’s Console tab in Developer Tools. For WordPress users, ensure both "WordPress Address" and "Site Address" in General Settings are set to https://. Use tools like wp-cli to update all instances of http://yourdomain.com to https://yourdomain.com in the database.
Enable "Automatic HTTPS Rewrites" in your CDN dashboard to fix legacy HTTP links automatically. Additionally, add a Content-Security-Policy: upgrade-insecure-requests header to ensure browsers upgrade HTTP requests to HTTPS. If you’re using a custom CDN hostname (e.g., static.example.com), verify it has a valid SSL certificate.
"After 12+ years fixing production WordPress sites, the fastest stable path is: enforce HTTPS at the edge, correct WordPress URLs, run a precise database search‑replace, and clean any theme/plugin hardcoding."
– Sanjeet Chauhan, Blogger & SEO Expert, YouStable
Finally, double-check your DNS settings to confirm all changes have propagated correctly.
DNS Propagation Delays
DNS propagation refers to the time it takes for DNS record updates to reflect across global resolvers. While updates often complete in 4–8 hours, full propagation can take up to 48 hours. The delay depends on the Time to Live (TTL) settings, which determine how long resolvers cache records before fetching updates.
To minimize propagation delays, reduce your TTL to 300 or 600 seconds (5–10 minutes) at least 24–48 hours before integrating your CDN. Use tools like dig +trace or nslookup to confirm your updated record is live. Flushing your local DNS cache (e.g., ipconfig /flushdns on Windows) can help you see changes more quickly.
Online tools such as DNSChecker.org or WhatsMyDNS.net let you check how your DNS records resolve globally. If your ISP is still serving outdated data, consider switching to a public DNS resolver like Google DNS (8.8.8.8) or Cloudflare (1.1.1.1), or test using mobile data. For root domains (e.g., example.com), use ALIAS or ANAME records instead of CNAME to prevent resolution errors.
Once DNS records are updated, you may need to address caching issues to ensure your site serves the latest content.
Cache Not Updating
If your CDN is delivering outdated content, manually purge the cache by targeting specific files (e.g., /index.html) or using a wildcard (e.g., /*). Often, conflicting Cache-Control or Expires headers from your origin server are the culprits behind longer-than-expected caching.
Check response headers for X-Cache or Age values. A status of HIT means the content is being served from the CDN’s cache, and the Date header will show how old the cached version is. Ensure your backend servers provide consistent ETag and Last-Modified values to avoid the CDN treating identical files as separate objects.
For static assets like JavaScript, CSS, and images, use content hashes in filenames (e.g., style.a1b2c.css) to ensure any changes result in a new URL, bypassing outdated cache. Automate cache invalidation as part of your CI/CD deployment pipeline to clear outdated content when new code is deployed. If you’re using AWS CloudFront, the first 1,000 invalidation paths per month are free, with additional paths costing $0.005 each.
"CloudFront caching stale content is solved by three strategies, in order of preference: use versioned URLs for static assets (best), set proper Cache-Control headers on your origin (good), and use invalidations as a last resort (quick fix)."
– Nawaz Dhandala, Author
Conclusion
The Benefits of a CDN for Your Business
Integrating a CDN into your website isn’t just about faster load times – it’s about creating a better experience for your visitors while protecting your infrastructure. Studies consistently show that quicker websites lead to higher conversion rates and fewer bounces. A properly configured CDN can offload 80–95% of static traffic from your origin server, shielding it from crashes during traffic surges and helping cut infrastructure costs. Plus, features like DDoS protection and SSL encryption add an extra layer of security, while the ability to scale instantly ensures you’re ready for viral moments or product launches.
These enhancements align with the broader integration strategies discussed earlier, ensuring that your CDN contributes directly to measurable business success.
Steps to Ensure Success
To get the most out of your CDN, careful preparation and ongoing adjustments are key. Start by cataloging your static assets and using versioned filenames like app.v123.js alongside Cache-Control headers such as public, max-age=31536000, immutable. This ensures users always receive updated content without compromising load times.
Keep an eye on your cache hit ratio – it should ideally stay above 80%. If it dips, investigate potential issues like query strings or conflicting headers that might be fragmenting your cache. Use tools like Lighthouse for lab tests and Real User Monitoring (RUM) to gain insights into how your site performs for users in various locations.
"If your static files suddenly had to serve 100x more traffic tomorrow, would your current setup survive – or collapse under its own weight?" – BlazingCDN
To streamline operations, integrate cache invalidation into your CI/CD pipeline. This automates purges during deployments, avoiding risky "purge all" actions that could overwhelm your origin server. By following these practices and maintaining regular reviews, your CDN setup will consistently deliver the speed, reliability, and scalability needed to support your business as it grows.
FAQs
Should I use a full-site CDN or only for static files?
When it comes to improving load times and overall performance, using a CDN (Content Delivery Network) for static files – like images, CSS, JavaScript, fonts, and downloads – is a smart move. CDNs help distribute these assets across multiple servers worldwide, ensuring faster delivery to users, no matter their location.
While some setups may integrate a CDN for the entire site, this is less common and usually only required for unique situations or specific needs. For the majority of websites, prioritizing static assets strikes the right balance between ease of use and enhanced performance.
What cache settings should I use for HTML vs images vs CSS/JS?
For the best balance between performance and keeping content fresh, try these cache settings:
- HTML: Opt for shorter durations or even
no-cache, as HTML content tends to change frequently. - Images: Set longer durations, such as several days or even weeks, since image updates are rare.
- CSS/JS: Use extended durations combined with cache-busting techniques (like versioned filenames) to make sure updated files load when necessary.
These adjustments help maintain fast load times while ensuring your content stays current.
How do I fix mixed content or SSL errors after enabling a CDN?
To resolve mixed content or SSL errors, make sure all resources on your website – like images, scripts, and stylesheets – are loaded through HTTPS. Update any URLs in your site’s code, theme settings, or CDN configuration to use HTTPS instead of HTTP. After making these changes, clear both your browser cache and your CDN cache to ensure the updates take effect. If the problem continues, manually update insecure URLs in your files or database. Also, double-check that your SSL certificate and CDN are properly set up to support HTTPS connections.